Tuesday, February 12, 2013

Chef Mik's Pad Thai


Today I’m preparing Pad Thai, which is a super simple dish to make, from Thailand via Vietnam though in some respects it is perhaps closer to Chinese cuisine in so much as it is a fried noodle dish. One of the main differences between Chinese and Thai food however is Thai food tends to be sweeter as Thailand uses a lot of palm sugar or other sweeteners in their food preparation. The dish is typically garnished with shrimp, peanuts, cilantro, scallions, sometimes cucumbers, tomatoes and pickled vegetables

One thing I like about Pad Thai is that you can make the sauce ahead of time, you can also make more then you need as it will keep for at least a week or two in the refrigerator. What I normally do is make at least a liter at a time, then pour enough for a serving into a squeezey bottle, and just refill accordingly. 

You can also prep the main components separately ahead of time such as the chicken, shrimp, egg scramble and noodles then simply assemble a la minute in a pan or wok when need be. When you are working the line in a busy eatery, cooking for a large group or party or simply cooking for family and/or friends on the go this is a great alternative, that said try it this way at least once first to get a good feel for the dish.

This recipe calls for tamarind, which is basically a pod sort of fruit used in many cultures around the world. In the case of Pad Thai instead of going out of your way looking for the pods and processing them you can use ready made paste, concentrate or juice all of which work fine, though you can also substitute simple broth or stock if you like or don’t have access to tamarind. I will be using both stock and tamarind today.

Pad Thai also calls for rice noodles now there is a seemingly endless verity of rice noodles to choose from, if you get lucky like I did at the store they will be labeled “pad Thai noodles” assuming this is not the case then for this dish what you should look for are flat noodles about 1/2cm wide.

Lastly a word about Galangal which is similar to ginger though perhaps with a bit more of a peppery profile first used in the kitchens of Indonesia it is also commonly used in Eastern medicine. Galangal is a wonderful ingredient not used enough in Western cooking. Look for tight vibrant roots, absent blemishes or any sign of either decay (slime and/or mold) or withering (dried out appearance), sometimes it is sold grated prepackaged.

Shopping List
Chicken, I am using thighs but breast are fine
Shrimp, heads and shells removed
Eggs
Limes
Scallions
Thai chili
Cilantro
Galangal, but ginger is fine
Garlic
Sprouts
Peanuts
Tamarind
Chili sauce or paste, I am using sambal oelek
Chicken stock or broth, I am using a prepared Asian stock
Fish sauce
Soy sauce, I am using mushroom soy
Sugar, I am using palm sugar but brown sugar is fine

My Mad Method

Ready to serve!!!!


Take a look at the ingredients so you have a basic idea what to look out for when you go shopping  


Prepare sauce: 2dl chicken stock or broth, 1dl tamarind concentrate, 2 garlic cloves, 3 TBSP fish sauce, 2 tsp soy sauce, 1 tsp chili paste, the juice from half a lime and 2 to 3 TBSP sugar place all ingredients in a small pot, bring to boil melt sugar adjust flavor to taste


Portion scant 75 to 100g chicken per serving, season with soy sauce set aside


Boil a pot of water off the heat add rice noodles consider about 75g per serving steep for about 5 to 6 minutes drain, shock in ice bath to stop cooking and prevent sticking


Shell and devein shrimp and consider 4 to 6 per serving depending on size


Heat wok add 2 TBSP peanut, canola or olive oil heat though, add 3 Thai chilies chopped, 1 TBSP galangal grated, 2 garlic cloves minced and a small handful scallions (white parts only stir fry 30 seconds


Add chicken and cook until ¾ finished


Add shrimp continue stir frying about a minute or so longer or until shrimp has turned pink orange and add two eggs beating it as it cooks when cooked through toss with other ingredients in the pan


Add the noodles along with 1 dl sauce stir to combine, as the sauce dissipates (about 2 minutes) add 1 more dl sauce and repeat until that has been absorbed check consistency to determine if the dish requires any additional cooking if so add additional sauce


Add the sprouts continue cooking for about a minute or so longer until the sprouts have softened adjust seasoning to taste  


Tuesday, January 29, 2013

Chef Mik's Biscotti


Today I’m baking biscotti which is the plural, the singular being biscotto an Italian cookie whose heritage can be traced to the Northern Port city of Genoa. The city itself is also famous for giving the world pesto and salami and the Italian sea captain turned explorer Cristoforo Colombo or Christopher Columbus in English. The name biscotti refers to the cookie being twice baked or cooked much like ricotta which derives its name from the cheese curd having been cooked twice. Biscotti similar to the English term biscuits which refers simply to cookies themselves

Biscotti is quite similar to the Yiddish or Eastern European cookie mandelbrodt or almond cookie in English in so much as they are both crispy, often filled with a wide verity of varying ingredients and they are both prepared and baked first as a loaf before being sliced much like bread then baked again

The cookies themselves are quite easy to prepare and lend themselves well to interpretation which is great for the more advanced and avid risk takers or those with certain food restrictions that may dictate what ingredients can be used.

We here at FoodPerfected offer a wide verity of biscotti, however when I bake them for myself I like to keep it simple. That said some bakers I know like to beat their egg whites to stiff peeks before incorporating them into the batter which is fine but by no means mandatory, others are very particular about the type of flour used as well as the fillers. While still others dip them in chocolate or decorate them after they have been baked. My advice as always is stick to the basics first and master them before biting off more then you can chew.

Shopping List
Almonds
Sugar
Butter
Eggs
Galliano
Vanilla extract
Flour
Baking powder
Anis seed
Salt

My Mad Method

Ready to serve!!!


Cream together 2.5 dl sugar and 115g butter


Add two eggs, one at a time and whisk until fluffy


Add wet ingredients: 2 TBSP Galliano and 1 tsp vanilla extract whisk until well incorporated


Add dry ingredients: 6 dl flour, 2 tsp baking powder, 1 TBSP anise seeds (crushed) and ¼ tsp salt mix until you have a good semi moist cookie dough


Fold in 2 dl toasted cracked almonds


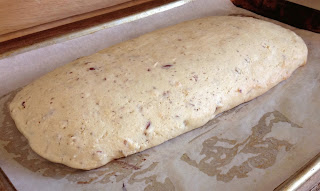
Form a uniform loaf on a sheet pan that has been covered with well greased parchment paper


Bake 30 to 40 minutes in a 175c preheated oven, when done allow it to rest 20 to 30 minutes before slicing it, reduce the oven temp to 150c


When you have sliced the loaf arrange the cookies on the same parchment paper and bake 10 minutes flip the cookies and bake ten minutes longer or until golden brown and crisp 
 

Monday, January 14, 2013

Chef Mik's Take on Key Lime Pie


Today I am baking Key Lime Pie, as the name would suggest it is derived from the Florida Keys. It is a quite popular pie here in the States as well as abroad and is very easy to prepare. The standard recipe for Key Lime Pie are all pretty much the same, as for presentation which I will elaborate more on below but will say they also work well as bars or squares

Two of the key ingredients (if you will) may need a little explanation. The first of which The Key lime sometimes referred to as the Mexican lime or bartenders lime is a smaller somewhat tarter, yellow skinned lime with seeds. Although in a pinch the standard Persian verity found in most any grocery store will do just fine.

As mentioned Key limes have a yellow peal or skin, while many times the Key lime pie is green, which has nothing to do with the lime itself even if you use a green lime it will still not be green, the simple reason is the color is artificial. If you like you can add a couple drops of green food dye.

As for sweetened condensed milk variations of which trace back several hundred years not unlike evaporated milk were most likely designed as a means of storing milk considering there was no refrigeration. Modern improved versions can be found at most grocery stores and will last for years if unopened. Another option is to prepare your own at home simply with a reduction of water, butter and sugar finished with the incorporation of powdered milk.

Due to the fact condensed milk is so sweet no extra sugar or sweetener is required for the preparation of the filling, though typically the pie is served in one of 3 ways, topped with a meringue, served with whipped cream or crème fraîche / sour cream all of which can and maybe sweetened as well  


Shopping List
Key limes and 12 to 15
Eggs
Sweetened condensed milk
Graham cracker crumbs
Butter
Sugar, caster (granulated) or baker’s is fine

My Mad Method

Ready to eat!!


These are what Key limes look like, these are from my fathers family home and when they are ripe they will drop to the ground


Measure 1.25 dl Key lime juice and 1 ½ tsp zest, set aside


Mix together 3 dl graham cracker crumbs, 2 TBSP sugar and 100g butter melted


Pour the crumb mixture into a pie form and work until evenly and uniformly distributed throughout


Bake for 10 minutes in a 175c preheated or until browned, then cool so the pie shell sets, reduce the heat in the oven to 150c


Whisk together 4 egg yokes for about 3 to 5 minutes until they have emulsified and a sufficient amount of air has been whipped into them  


Slowly pour in 1 400g (14 oz) can of sweetened condensed milk while the mixer is set on low


Pour in the reserved lime juice a little at a time mixing to combine


Add the reserved zest and mix quickly just to combine


Pore over into prepared pie shells and bake for 15 to 20 minutes or until filling sets, be careful not to get to much color on the pie shell


When baked chill for at least 4 hours or over night

Ready to serve!!!